


In this one, we find the symmetry numbers of 26 cu and 27 cu; there is one 9 cu. I sutpose you guessed it already; the ratio of 27 to 9 is 3:1. #37,#34,#90,#69,#72, #26 are good hits, and the remaining three are okay, but not great.
Now we will explore the radial aspects of these vortexes. #37 (5.3 ru) and #53 (21 ru) give a ratio of 1:4. #37(5.3 ru) is also in a ratio of 1:3 with #15 (16 ru) and #69 (15.9 ru). #34(10.1 ru), #72 (20.5 ru), and #90 (30.4 ru) are in a 1:2:3 ratio.
It must be emphasized once again that this pattern of symmetry was generated only as a circumferential pattern. Subsequent investigation revealed the radial symmetry shown above.
Let's look at yet another chart, for those that demand still one more example.
The center for #42 was chosen as the point where the warm and cold fronts meet. The symmetry with 10 cu as the lowest common denominator is obvious. There is one 18 cu and one 4 cu to complete the ring. Only #45, #39, #37, #76, #18, and #90 have the rays going right through their center. These were the points on which the symmetry pattern was set up. The additional points used were added as a matter of interest only, since they represent obscure vortexes and some of the points do not make perfect hits with the ends of the rays. The nuclear vortex in this example does not consider these additional points as being obscure. It is obscure to us, only because we are trying to analyze a map that was drawn without foreknowledge by the ones who drew it, that there were resonant oscillations which could be identified with accurate locations of centers.
In spite of these difficulties, there are also elements of radial symmetry. #40 is 4.6 ru out from the center and this is across from #16, which is 9.2 ru, for a ratio of 1:2. #16 (9.2 ru) and #8 (27.1 ru) are approximately 1:3. #11 (28.9 ru) is almost directly opposite #76 (29 ru).
#40 and #69 are both on a single straight line joining #42, even though the ray from #42 is broken to permit the entry of the numerical data. This is also true for the points of #39 and #90.
There are additional symmetry patterns around #42 that are not shown which you can ferret out on your own. I am only showing some of the major highlights, in the understanding of Singer's Lock and all of its ramifications.
I think that you are now 183 % convinced that the scattering of highs, lows, and cols over a hemisphere is not a wretched, amorphous arrangement; but is instead, the arrangement of a highly polished diamond with many facets. Nevertheless, I will now add 183 more charts as additional proof for the inevitable few remaining holdouts that need additional arm-twisting to be convinced. These additional charts will also expand your insight into intricate maneuvers committed by highs and lows.


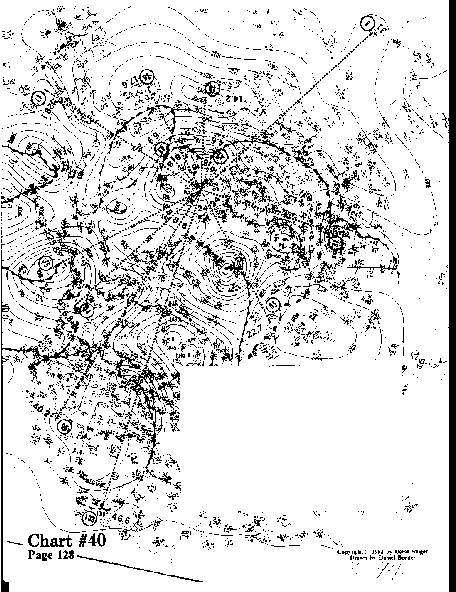
In this example, the rays end on the center of most of the points chosen. Only #8 and #69 are off slightly. The symmetry is not as uniform as in the previous examples, but is still impressive. We find that 15 cu and 14 cu predominate with two 20s side by side; the 7 cu is of course half of 14 cu.
The points creating the three separate 4 cu have radial distances that are fascinating. #88 (25.9 ru) and #8 (25.9 ru) are exactly 1:1; while #86 (25.1 ru) and #7 (23.6 ru) are almost 1:1. This is quite an angular balance in both the circumferential and radial directions, even though #7 and #8 are relatively obscure centers. An additional twist is #60 (11.9 ru) and #7 (23.6 ru), both nearly in a straight line, show a ratio very close to 1:2; while #15 (12.7 ru) is nearly opposite to both #86 (25.1 ru) and #88 (25.9 ru) which gives a very close 1:2 ratio, if we take the average value of #86 and #88. #34 (7.7 ru) and #61 (14.6 ru) are almost in the ratio of 1:2, while on the opposite side we have #42 (8.7 ru) and #18 (16.7 ru) at almost 1:2; and while #18 (16.7 ru) and #30 (16.2 ru) counterbalance each other by nearly 1:1.
#18 (16.7 ru) finds a counterpart in #30 (16.2 ru); while #30 (16.2 ru) and #51 (31.8 ru) are counterparts in the ratio of almost 1:2. In conclusion, #18 (16.7 ru) and #76 (33 ru) are counterparts in the ratio of almost 1:2; while #12 (15.3 ru) and #90 (31.1 ru) are counterparts in the ratio of almost 1:2.
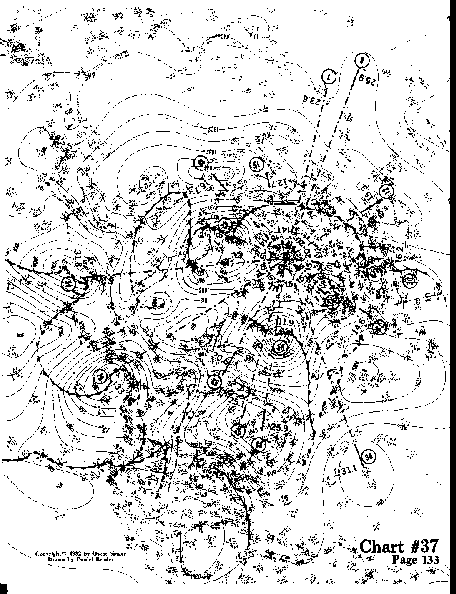

In this example, all the rays hit very close to the center of the selected vortexes. We find that the symmetry pattern is established by the predominating angular number of 11 cu, with 10 cu, 12 cu, and 13 cu also occurring. The angular number of 23 cu is of course composed of an 11 plus a 12; a 6 plus a 7 add up to a 13; and a 6 is one half of a 12. Interestingly enough, we find the two 6 cu are almost symmetrically opposite to each other. I have not shown the radial distances on this chart and in the succeeding charts in this series. After all, this series is concerned with showing circumferential symmetry throughout the entire map. I had added the radial data on the previous charts to spice things up. But enough is enough--for now.